Sunday, November 14, 2010

Pumpkin and Squash Lasagna

Here's a delicious recipe for comfort food lasagna made with seasonal veggies. Lasagnas always take some effort but the leftovers are worth it. And never mind that lasagnas are great for make ahead meals, perfect for entertaining! This one is truly elegant.


Before:

Pumpkin and Squash Lasagna.

Serves 6 - 8

You can buy can pumpkin and frozen squash. If you buy fresh, put some slits in the skin and microwave for 7 minutes on high. This will par cook the pumpkin and squash enough so it's manageable.

Ingredients:

White Sauce

  • 1/4 cup butter
  • 1/4 cup flour
  • 3 cups skim milk
  • 1/2 cup grated parmesan
  • 1 tsp dried thyme
  • 2 tsp dry mustard
  • 1 tsp dried parsley
  • 1/2 tsp salt (to taste)

Veg Filling:

  • 2 cups diced butternut squash
  • 2 cups diced pumpkin
  • 1 cup diced broccoli
  • 1 500g tub of 1% cottage cheese
  • 2 tsp dried sage
  • salt and pepper to taste

Additional Ingredients:

  • 9 - 11 lasagna noodles, spinach would work nice for added colour
  • 1 cup small scallops
  • 2 cups shredded part skim mozzarella
  • Dried parsley to sprinkle on top

Instructions:

  1. Heat the oven to 350
  2. Heat a saucepan over medium high heat and melt the butter until bubbly
  3. Whisk in the flour and cook one minute, reduce the heat to medium
  4. Slowly whisk in the milk and heat until thick
  5. Stir in the Parmesan, thyme, parsley, dry mustard and salt. Set aside
  6. Place all of the vegetable filling ingredients in a food processor and blend (if you don't have food processor, finely chop or mash the veggies and mix with remaining ingredients). Set aside.
  7. Take a 8 X 11 (or whatever size pan you have!) pan and spoon is a nice bit of sauce. Place a layer of noodles on top of the sauce, then cover those noodles with another layer of sauce.
  8. Scoop on a layer of the veggie mix. Cover with another layer of noodles and then white sauce.
  9. Spread out a layer of scallops and cover them with mozzarella. Then another layer of noodles and sauce.
  10. Keep layering until you run out of ingredients. End with a layer of noodles, white sauce and mozzarella.
  11. Bake at 350 for 50- 55 minutes until golden.

After (this is all that's left...):

This will freeze nicely but I've run out of freezer space. We all knew it would happen one day. (I've been stocking up on meats and veg for the holiday season when things have been on sale!)


Wednesday, November 10, 2010

Christmas Baking 2010

I've started my Christmas baking... that's right, I've started. I have a few things going on and I might not have the time later so I figured I should take advantage of my time now. Most baked goods freeze well so it's a great thing to get ahead on before the season slaps you in the head and you're staring at Christmas Eve like a dazed reindeer stuck in the headlights.

I've done up a batch of Swedish Pepparkarkar and Skor Cookies. Whether or not they make it to Christmas is another story. I would like to point out that when making the Skor cookies it is best to use parchment paper. You'll run the risk of ruining your cookie sheets if you just grease them. The melted skor bits are like cement stuck to the pan, no matter how well you grease it. Parchment saves your pan, you can use just the one sheet for the entire batch and clean up is a snap!

Also I've also been stocking up on sales items now to defray the cost of the holidays as we get closer to the winter solstice. I've already got my turkey when one store had buy one get one free on turkeys recently. I've stocked up on chicken; whole, pieces, bone in and boneless. I've bought prime rib and steaks.... And there has been some nice sales on excellent quality frozen veggies (because by the end of December our local fresh veggies are starting to get scarce so frozen is the way to go). I've also stocked up on crackers. Hmmm, must watch out for sales on pop and juices....

Thursday, November 04, 2010

The Best Ever Butternut Squash Soup.

I've enjoyed my fair share of pureed fall squash soups but this one rocked it out of the park. Simple and cheap too, some of my favorite qualities in a recipe. I only used half a medium squash so I diced up the rest of the roasted squash and tossed it in the freezer for use at a later date.

Butternut Squash Soup with Bacon and Apple
Serves 5 - 6

Ingredients:
  • 5 cups diced butternut squash
  • 5 slices of bacon, diced
  • 1 large onion, diced
  • 4 cloves garlic, minced
  • 3/4 cup diced tomatoes, fresh or canned
  • 1 tsp dried sage, thyme, savoury and oregano (or any combination of these)
  • 4 cups chicken broth, low sodium
  • 3/4 cup apple juice or cider

Instructions:
  1. Cut squash in half, scoop out the seeds and roast for 30 minutes at 350 or slit the skin of the squash with a knife and microwave for 5 - 7 minutes. Peel the squash, remove the seeds and dice into small pieces.
  2. In a large saucepan, over medium low heat cook bacon until crisp. Remove from the pan and drain on paper towel. Leave about 2 tbsp of the bacon grease in the pot.
  3. Increase the heat to medium high and saute the onions until soft
  4. Add the garlic, tomatoes and herbs. Cook until the tomatoes break down
  5. Add the broth and scrap any bits off the bottom of the pot.
  6. Add the squash, bring to boil and then simmer until the squash is soft
  7. Use either a hand blender or regular blender to puree the soup.
  8. Serve with the bacon sprinkled on top.

This soup freezes really well and is perfect for those chilly fall or cold winter meals!

Monday, October 25, 2010

In honour of Breast Cancer Awareness Month

Pink Risotto! (If your computer doesn't show it as pink, trust me - it was bright pink!)

Beet Risotto - just dice and boil or roast the beets first. Make your risotto and add in the beets when the rice is almost cooked. I threw in a pinch of dried rosemary and, of course, lots of Parmesan! YUM

Sunday, October 24, 2010

Moroccan Chicken, Turnip and Carrot Tagine

I had one tasty dinner tonight! It incorporated some root veggies that are piling up in the farmers markets at the moment and turmeric. I do rave on about turmeric but it's for a good reason. I remembered to get a pic before it was all gone...


I used chicken breasts because I hadn't taken anything out of the freezer and I knew they would defrost and cook quickest. I would have used chicken pieces on the bone if I had planned ahead.

Moroccan Chicken, Turnip and Carrot Tagine
Ingredients:
  • 1 tbsp olive oil
  • 1 medium onion, chopped
  • 2 tsp turmeric
  • 2 tsp cumin
  • 2 tsp cinnamon
  • 2 tsp paprika
  • 1/2 tsp ginger
  • 1 tsp thyme
  • 3 cloves garlic, minced
  • 4 chicken breasts, cubed
  • 1 medium turnip, peeled and cubed
  • 4 large carrots, peeled and cubed
  • 2 tbsp tomato paste
  • 2 cups chicken broth (or enough to cover everything in the pot)
  • 1 cup brown lentils(optional)

Instructions:
  1. Preheat oven to 325
  2. Heat a large, oven safe pot over medium high heat with the olive oil
  3. Saute the onion until soft.
  4. Add in all the spices from turmeric through thyme and cook in the pan for 2 -3 minutes
  5. Add garlic, chicken, turnip and carrots, sauteing until a bit brown, 3 - 5 minutes
  6. Mix in the tomato paste and broth.
  7. Cover and place in the oven for 1.5 hours.
  8. Place the pot on the stove on medium heat.
  9. Add the lentils and let simmer until they are tender, about 20 minutes
  10. Serve with couscous!

Amazing!

Monday, October 11, 2010

Canadian Thanksgiving

Wow! It's been a while since I blogged. It's been a busy fall thus far! Today is one of those days when I feel like fall is officially here. Last week it was still warm and really humid. But now the weather has changed, it's getting cold at night, the leaves are turning wonderful shades of orange and red and this weekend is Thanksgiving! I do adore a turkey basted with herbs and butter and roasted until golden. Mmmmm, mmm!

This Thanksgiving I've added a few twists which I'll share but first make yourself - A Thanksgiving Cocktail! If you want so good tips for a perfect bird and lovely meal check out here.

Dry Brining
I dry brine my bird. It's easier then trying to find a space big enough to hold a turkey swimming in salt water. I just rub the bird with a good layer of salt put it in a bowl and cover and let it sit for 12 - 36 hours. Turn the bird around from time to time. I also added some herbs mixed with olive oil under the skin on the breast. She was a moist one, I've got to say...

Cranberry Sauce
I've been making my own for years but I got the feeling that my mother didn't really like my spicy pinot noir version so this year I went a little simpler and it was perfect!

Ingredients:
  • 3 cups fresh or frozen cranberries
  • 2/3 cup orange juice
  • 1/2 cup water
  • 1/4 cup maple syrup
  • 2 tsp pumpkin spice

Instructions:
  1. Mix everything together in a saucepan and heat over medium heat.
  2. Simmer until the cranberries are all popped and broken down - about 15 - 20 minutes
  3. Cool and enjoy!
Roast Veggies
This year, instead of mashing turnip and carrot, I boiled them the night before and then popped them into the oven while the turkey was resting. One less pot on the stove and it really cut down on my prep work on turkey day.

Ingredients:
  • 5 medium parsnips
  • 1 medium turnip
  • 2 lb carrots
  • 3- 5 cups chicken broth
  • 2 tbsp honey
  • 2 tsp turmeric
  • 2 tsp dried thyme
  • 2 tbsp vegetable oil

Instructions:
  1. Peel and cut the veggies into similar size pieces, about 1 1/2 inches each
  2. Boil the veggies in the chicken broth (I had already made my turkey broth so I used that!) until just tender when poked with the fork
  3. Drain the veggies (this can all be done the day before)
  4. Preheat the oven to 375F.
  5. Mix the honey, turmeric, thyme and veg oil. Toss the veggies with the mix
  6. Place in a shallow pan in a single layer
  7. Bake for 30 - 40 minutes.

Not only is this a tasty dish but you get some turmeric which is good for everything from your joints to your brain!

Happy Autumn!

Wednesday, September 15, 2010

Veggies in Containers!

I started some mesclun greens in a container to grow continually all winter. Holy mackerel, has it ever taken off!

I did a second planting but the first one is giving me salad after salad. I cut the biggest leaves whenever I want them and a single seed gives me leaves night after night. Great mini-project for the kids to help them understand where our food comes from. And once they put in the effort and watch something grow you'll be surprised how eager they are to eat it!

I also have cherry tomatoes still on a plant that I can drag in on chilly fall nights.
And I've started two more tomato plants to have over the winter. Look for seeds that state they are good for containers because some varieties really don't do well in pots.


Monday, September 13, 2010

Summer Veggie Medley Bake

Got extra veggies from the fall harvest? Here's a great veggie dish to bake up and freeze for yummy veggies all winter long.

Summer Veggie Medley Bake
Serves 8

Ingredients:
  • 28 oz. diced tomatoes
  • 2-3 medium zucchini, diced
  • 2 onions, red, white or both, chopped
  • 3 green onions, sliced
  • 2 cloves garlic, minced
  • 1 1/2 cup corn, about 2 ears of corn
  • 1 cup feta, crumbled
  • 2 cups shredded cheddar cheese
  • 1/4 cup Italian salad dressing

Instructions:
  1. Preheat the oven 350
  2. Mix all the ingredients together and put in a baking dish
  3. Bake 50 minutes until all the veggies are tender

Freeze any leftovers. They go great over couscous, rice or pasta with a side of pork, chicken or fish. Easy!

Sunday, September 05, 2010

Turmeric

I've been trying to increase my turmeric intake lately. I don't get excited about every latest and greatest "super food" but this spice is worth the consideration. There is believed to be a correlation between turmeric and lower rates of Alzheimer's. It may help in the fight against cancer, slow down the progression of MS and that's not all! Seriously, check it out.

Most of us think of turmeric as a spice to add to curry. But since a lot of North Americans don't have curry regularly it's hard to get more turmeric in our diets. Here's a couple of easy ways to up your intake. And remember, ground spices only last about 6 months so be sure to replenish your supply regularly!

1. Add a good sprinkle to boiled or glazed carrots or turnip right before serving and toss well.
2. Add to tune, egg or chicken salad.
3. Add a bit to your dry rubs for ribs, chicken or pork
4. Add a bit to your breading if you're making fried foods or oven baking items with a breading.
5. Throw a bit in your tomato sauce for an interesting layer of flavour.
6. Sprinkle on cauliflower, squash, potatoes or broccoli... or whatever veggie peaks your interest!
7. Of course you want to add turmeric to any Moroccan, Indian or even Thai dishes.
8. Add it to Chili!

Tonight I'm having pork with rosemary, thyme and apples with diced turnip on the side. I'll sprinkle the turnip with some turmeric which will compliment the grilled apples on the plate. Yum!

Saturday, August 21, 2010

Smoked Trout Clubhouse Sandwich

This is my new favorite sandwich. My uncle smoked some trout for me. Seriously delicious!!

Smoked Trout Clubhouse
Serves 1

Ingredients:
Your favorite bread!
Smoked trout or salmon
1 slice of bacon, cooked
Tomato, sliced
Lettuce
Mayo
Basil, chopped
Mozzarella or havarti

Instructions
  1. Toast the bread
  2. Mix the mayo with the chopped basil
  3. Spread the mayo on the bread and top with the trout, bacon, tomato, lettuce and cheese
  4. Enjoy!

Wednesday, August 18, 2010

Potato Salad

I had a great potato salad with my new potatoes. You can do lots of variations so have some fun!

Potatoes, boiled and diced
Sausage, cheddar smokies
Green beans, boiled and diced
Mayo
Dijon Mustard
Cider vinegar
A smidge of creamed horseradish
Fresh rosemary, thyme, basil and oregano. All chopped

Toss it all together and enjoy!

Saturday, August 14, 2010

POTATOES!!

The fruits of my labour! Okay, to be fair, they are veggie, not fruits....

The first potatoes out of the garden! Note the one with the big line indent down it. Seems that one was growing near a rock. The skin is perfect inside the line indent. Isn't nature funny!?

Friday, August 13, 2010

Salmon Cakes

Here's an easy recipe. I'd love to add a picture but there was no way these delicious cakes were going to last that long around here!

Salmon Cakes
Serves 2

Ingredients:
  • 1 tsp canola oil
  • 1 tsp butter
  • 200g/6 - 8 ounce fillets, skin removed and diced
  • 2 medium potatoes, cooked and mashed (I microwaved them in their skins and then mashed them, skin and all)
  • 1 egg
  • 2 green onions, diced
  • 2 tbsp chopped fresh dill
  • salt and pepper

Instructions:
  1. Preheat oven to 350
  2. Heat oil and butter in an oven safe skillet over medium high heat.
  3. Mix everything together and shape into patties
  4. Drop patties into pan
  5. Cook until browned and flip
  6. Place skillet in oven and cook 7 - 10 minutes until cooked through
  7. Serve with some yogurt sauce

Enjoy

Saturday, August 07, 2010

Best Green Beans Ever!

Last night I dressed up my green beans. So easy and sooooo tasty. So I just had to share. They're in season so go get yourself some!

Best Green Beans Ever
Serves 2

Ingredients:
  • 1/2 lb green beans, trimmed
  • 2 slices bacon, diced
  • 1 shallot, diced
  • 1 tbsp red wine vinegar
  • 1/2 tbsp dijon mustard
  • 1 tbsp lemon juice

Instructions:
  1. Heat a pot of water on the stove until boiling, add green beans and cook 2-3 minutes until bright green. Immediately remove from heat, drain and rinse with cold water. Set aside
  2. Put the diced bacon in a skillet and heat over medium heat
  3. Cook the bacon until crispy.
  4. Remove the bacon from the pan and drain on a paper towel
  5. Remove all but 1 tbsp of the bacon fat from the pan
  6. Add the shallots and saute until golden.
  7. Add the green beans, red wine vinegar, mustard and lemon juice.
  8. Heat through
  9. Toss back in bacon bits.
Enjoy!

Thursday, July 22, 2010

Sliders!

Just to jump on the latest trend, I did some sliders the other night. It is fun to sample a couple of different burgers instead of having to commit to one taste or eat like Attila the Hun.

I got the thin buns from the Atlantic Superstore. You could also use mini-pitas or dinner rolls. Each person gets 3 each (one of each!). You should get 12 burgers from 1 lb/454g of meat.

Blue Cheese Burgers
  • Beef
  • Worcestershire sauce
  • Onion
  • Blue Cheese
  • Bacon/Capocello/Prosciutto
  • BBQ sauce
  1. Mix the beef and Worcestershire sauce together and form into patties
  2. Grill the burgers, onion and bacon/capocello/prosciutto
  3. When the burgers are almost done top with the blue cheese
  4. Put some bbq sauce on a bun, top with bacon, burger and onions.

Mediterranean Burger
  • Beef
  • Feta
  • Mint, chopped
  • Oregano, chopped
  • Garlic Powder
  • Red Onion
  • Red Pepper
  • Tzatziki sauce
  1. Mix the beef, feta, mint, oregano and garlic powder and make into patties
  2. Grill the burgers, peppers and onion
  3. Place the burgers on the bun, top with the pepper, onion and tzatziki sauce

Traditional Burgers
  • Beef
  • Onion powder
  • Garlic powder
  • Cheddar
  • Lettuce
  • Tomato, sliced
  • Ketchup
  1. Mix the beef, onion and garlic powder and make into patties
  2. Grill the burgers, add the cheddar cheese when the burgers are almost done
  3. Assemble the burgers by placing on a bun and topping with lettuce, tomato and ketchup

Friday, July 09, 2010

Leftover Chimichurri

Here's a great use for that extra Chimichurri sauce. You can freeze it for later or......

Cut cherry tomatoes in half, grill and then drizzle with the chimichurri! Holy mackerel it's freakin' tasty!

Nice cold beer or wine and you're maxing and relaxing!!

Enjoy!

Thursday, July 08, 2010

2010 FIFA WORLD CUP FINAL!!!

Have you been enjoying my 2010 FIFA World Cup Menu? Here's the links to each weeks menu.
Week 1
Week 2
Week 3
Week 4

Waaahoooo! Could it be any more exciting?! Spain made it to the finals! Needless to say, I'm routing for Spain. I've even taught Ollie ( He's sitting on the couch, waiting for the game to start)


to cheer when they score. He even does a little dance!

Okay, on to the snacks for the game. We're doing a tribute to the two countries. We'll start with some Dutch cheese and beer. Then we'll move on to some Spanish tapas and beer. For the main course I'm grilling spring onions or leeks (whichever I can get) in place of the calcots which are the native onions, like small leeks from the Catalan region of Spain. They are traditionally served with romesco sauce and bread. I've actually seen the festival, the Calcotada, when the calcots are ready for harvesting. The Spaniards get a big fire going and grill huge batches of the calcots. They have big pots of sauce ready to go and everyone enjoys a meal with red wine or cava, Spanish sparkling wine. While the Calcotada is usually held at the end of winter when the calcots are ready for harvesting, grilling small onions or leeks is perfect anytime in the summer here in Canada.

Netherlands

  • Bavaria, Heineken or Grolsch Beer
  • Gouda and Edam Cheese
  • Crusty Bread

Spain

Tapas

  • Cherry tomatoes cut in half and sprinkled with garlic and thyme and grilled
  • Asparagus and green beans wrapped in serrano ham and grilled
  • Shrimp tossed with chopped dried or fresh red chilies, minced garlic and olive oil and grilled
  • Mixed nuts
  • Estrella Lager

Main Course

Grilled Leeks with Romesco Sauce

Ingredients:

  • 1 dried red chili
  • 1/3 cup red wine vinegar
  • 1/4 cup olive oil
  • 1/4 cup almonds
  • 6 cloves of garlic, peeled
  • 2 slices bread, cut into 1/2 inch cubes
  • 1 cup onions, chopped
  • 1 cup diced tomatoes
  • 1/2 tsp smoked Spanish paprika
  • salt to taste
  • 3 lbs, about 12 leeks

Instructions:

  1. Soak the red chili in the vinegar
  2. Heat the oil in a pan over medium high heat
  3. Toast the almonds in the pan, remove and place on a towel to drain
  4. Toast garlic in the pan until golden, remove and place on towel to drain
  5. Toast the bread crumbs in the pan, remove and place on a towel to drain.
  6. Cook onions in the pan until golden.
  7. Add almonds, bread crumbs, garlic, tomato and paprika to the pan and heat through for 2 minutes. Add water if the sauce is too thick.
  8. Place everything, including chili and vinegar, in a food processor or bowl and use a stick blender to puree until finely ground.
  9. Salt to taste and set aside
  10. Heat the grill to high.
  11. Thoroughly clean the leeks or spring onions by cutting halfway down but not all the way through the root end. Then you can get between the layers quite well.
  12. Brush the leeks with olive oil and grill until tender and charred a bit.
  13. Serve the leeks with some sauce poured over and some bread on the side for scooping up the leftover sauce
  14. Enjoy with a glass of cava!

Hmmm, seems to be considerably more food with a Spanish twist here.... Could it be that I'm biased?! You betcha!!! GO SPAIN!!!!!!!!!

Monday, July 05, 2010

Uruguay - Chivito al Pan

Here is the last recipe for the 2010 FIFA World Cup Menu - Week 4. Uruguay is the last remaining South American team in the World Cup so it is quite fitting that it is the last recipe! However, I am going to do 2 additional recipes for the 2 countries in the final game. Check back on Thursday July 8th for those.

This recipe is said to be a favorite with locals and tourists alike. It's so incredibly simple and basic that I was hesitant to use it to represent Uruguay. But Yummy is as Yummy does so here you go!

Uruguay - Chivito al Pan
Serves 4

Ingredients:
  • 1/2 tbsp butter
  • 1 lb 1/4 inch thick steak, boneless
  • 4 slices carved ham or ham steaks (not deli meat but cut from a nice piece of ham is better)
  • 4 slices mozzarella
  • 4 crusty sandwich rolls
  • 1 tbsp mayonnaise
  • 1 tbsp ketchup
  • lettuce
  • 4 slices tomato
  • 4 fried or boiled eggs (optional)

Instructions:
  1. Heat a pan over medium high heat, add the butter and melt
  2. Cook the steak in the pan when you flip the steak, top with the ham and mozzarella
  3. Cook until the mozzarella is melted
  4. Mix the mayo and ketchup together and spread on the 4 rolls
  5. Slice the boiled egg if using
  6. Top each roll with the steak, ham, mozza, lettuce, tomato and egg.

Enjoy!

Sunday, July 04, 2010

Nigeria - Pancakes with Shrimp

Here is another recipe from the 2010 FIFA World Cup Menu - Week 4. This one is kind of different and interesting. Definitely worth a try if you're feeling frisky!

Nigeria - Pancakes with Shrimp
Serves 8- 10

Ingredients:

  • 2 19 oz/540ml cans of white kidney beans or any white bean
  • 6 eggs
  • 2 medium onions, finely chopped
  • 2 medium tomatoes, chopped in 1/4 inch pieces
  • 1 lb cooked shrimp, cut in 1/2 inch pieces
  • 1/2 tsp salt
  • 1/4 tsp pepper
  • 1/4 tsp cayenne pepper
  • 1/4 cup vegetable oil


Instructions:

  1. Drain the beans and place in a food processor or blender with the eggs, adding each egg one at a time. (You may need to add more or less eggs to get a nice batter consistency depending on the beans you choose)
  2. Blend until smooth.
  3. Pour the batter in a bowl and add the remaining ingredients except the oil. Blend
  4. Heat the oil in a frying pan over medium high heat
  5. Spoon heaping tablespoons of the batter into the oil.
  6. Turn when the bottom is golden brown
  7. Keep cooked pancakes warm while frying the rest of the batter.

    Enjoy with a nice salad!

Saturday, July 03, 2010

Spain - Gazpacho

Here is another recipe for the 2010 FIFA World Cup Menu - Week 4. I love Gazpacho and it used to be one of my summer mainstays. I haven't made it much in the past few years but it is extremely healthy and terrific to have on hand during those long hot summer days. This version is inspired by Spain, so there are some differences so give it a try!

Spain - Gazpacho
Serves 6 -8

Ingredients:
  • 2 red peppers
  • 2 medium tomatoes
  • 4 cloves garlic
  • 1 cucumber, finely chopped
  • 1/2 cup olive oil
  • 2 tbsp sherry vinegar or red wine vinegar
  • 1/2 tsp fresh finely chopped tarragon or 1/4 tsp dried
  • 4 slices thick country bread, crusts removed
  • 1 liter vegetable cocktail, low sodium

Instructions:
  1. Heat the oven to 350 degrees
  2. Place the tomatoes, peppers and garlic on a shallow pan in a single layer.
  3. Roast for 30 minutes
    (You can also roast the tomatoes peppers and garlic on the BBQ over medium heat)
  4. The tomatoes will be done after 30 minutes, continue roasting the peppers and garlic for another 15 minutes
  5. Place the tomatoes and peppers in a glass bowl, cover and let stand until cool enough to handle, about 20 - 30 minutes
  6. Peel the peppers and tomatoes, discard the seeds and stems
  7. Dice and place with the garlic, in a food processor or blender, blend until still a little chunky
  8. Place in a large bowl.
  9. Soak the bread in some of the vegetable cocktail until soaked. Drain the bread and add it to the blender or food processor.
  10. Add cucumber, olive oil, vinegar and tarragon to the food processor or blender and blend until smooth.
  11. Put the cucumber and bread mixture in the bowl with the tomatoes, peppers and garlic.
  12. Add the rest of the vegetable cocktail to the bowl and stir
  13. Chill for 8 hours.
  14. Taste and add salt and pepper as necessary.
Enjoy!

Brazil - Chimichurri Beef

Here is a recipe from the 2010 FIFA World Cup Menu - Week 4. A lot of the South and Central American countries share recipes and there are variations of each so 'authentic' is more a state of mind than an actual requirement! Make it your own. This recipe can call for lime juice or not. I used lime juice because I had a fresh lime on hand. I've also seen the Chimichurri done with either cayenne pepper or crushed red pepper flakes. Use whatever heat source you want but use a little, the kick makes it really South/Central American. You can freeze this refreshing herb sauce in ice cube trays and have it on hand whenever you want a taste of Brazil (or Argentina or Mexico or Chile or .....)

Brazil - Chimichurri Beef
Serves 4

Ingredients:
  • 1 lb of flank steak or lean sirloin
  • 1 tsp salt
  • 1/2 tsp cumin
  • 1/2 tsp ground coriander
  • 1/4 tsp black pepper
  • 1 clove garlic
  • 1 cup fresh cilantro leaves
  • 1 cup fresh parsley leaves
  • 1/4 cup white vinegar
  • 2 tbsp olive oil
  • 2 tbsp lime juice
  • 1/2 tsp crushed red pepper

Instructions:
  1. Heat a grill to high
  2. Sprinkle the beef with the salt, cumin, coriander and black pepper
  3. Mix the remaining ingredients in a food processor or blender to make the Chimichurri sauce.
  4. Grill the beef to medium rare ( the more you cook flank steak, the tougher it will be)
  5. Cut the steak against the grain in thin slices
  6. Serve with the Chimichurri sauce on top

Enjoy with various salads or grilled veggies that are in season!

Friday, July 02, 2010

Fifa World Cup Menu - Week 4

The final week! I'm going to do something special for the finals so check back next Friday, July 9th.

2010 FIFA World Cup Menu - Week 4
1. Spain - Gazpacho
2. Uruguay - Chivito al Pan (changed from Arapas which I had orginally planned but didn't feel it was really representative of Uruguay cuisine)
3. Brazil - Chimichurri Beef
4. Germany - Bratwurst Sausages and Sauerkraut
5. Nigeria - Pancakes with Shrimp

I can't wait to make the Nigerian Pancakes with Shrimp. The shrimp is put right into the batter! Sounds delicious! Gazpacho is one of my favorite summertime soups but I haven't made it in a while. My traditional recipe is more of a take on tex-mex but for this menu I'll stick to something more Spanish inspired. The Bratwurst and Sauerkraut are this week's menu's store bought item. Just pick up your fav for a quick meal. If you don't like Sauerkraut then substitute a coleslaw. Cabbage is incredibly good for you!

As per usual, I'll add the links to the recipes as I add them to the blog throughout the week.

Here are the links for the other weeks in the 2010 FIFA World Cup Menu.
Week 1
Week 2
Week 3
Final Game Menu

Tuesday, June 29, 2010

South Africa - Bobotie (Beef Pie)

Here is the final recipe for 2010 FIFA World Cup Menu - Week 3. One more week to go. I'm going to do something special for the finals after the week 4 menu so stay tuned!

No matter where I looked when researching South Africa's cuisine I came across Bobotie. Basically it's a curry meat pie. Hmmm, beef, curry.... what's not to like! Some recipes call for apples and raisins in the beef mixture but I don't typically have those items on hand so I left them out. Add them if you like, it will give the recipe a sweetness and extra nutrients.

South Africa - Bobotie
Serves 6 - 8

Ingredients:
  • 1 medium onion, chopped
  • 1 clove garlic, minced
  • 2 slices of bread (preferably stale) soaked in milk, drained and torn up into small bits
  • 1 lb ground beef
  • 2 tbsp curry powder
  • 1 tsp turmeric
  • 1 egg, beaten
  • 2 tbsp lemon juice
  • 2 eggs
  • 1/2 cup milk

Instructions:
  1. Heat oven to 325
  2. Grease a 9 X 13 inch loaf pan
  3. In a large bowl mix the onion through to the lemon juice together.
  4. Place the mixture in the loaf pan and bake for 40 minutes
  5. Mix the 2 remaining eggs and the 1/2 cup of milk together well
  6. Place over the cooked beef loaf and bake for an additional 15 minutes

Enjoy!

Honduras - Black Bean Soup

Here is another recipe for the 2010 FIFA World Cup Menu - Week 3. This recipe has a few variables that allow you to make it your own. For the heat you can use whatever chilies you like. I've seen this soup done with jalapeno, chipotle or Tabasco. I've also seen people leave out the heat completely. In the summer a spicy meal that makes you sweat it a great way to stay cool so we'll be adding the heat here. I like a chipotle. When I open a can I take out each chipotle pepper and wrap it separately and freeze them. I never have a recipe that calls for a whole can of chipotle so freezing the leftovers individually means I have peppers ready to go for all those recipes that call for just one.

I've also seen this recipe call for sherry, red wine or dark rum. You can leave out the alcohol. I use whatever I have on hand. Usually that's red wine. It's only a small amount but it does give a little depth in the flavour profile of the soup.

Honduras - Black Bean Soup
Serves 4 -6

Ingredients:
  • 1 tbsp olive oil
  • 1 medium onion, chopped
  • 1 medium sweet red or yellow pepper, chopped
  • 2 cloves garlic, minced
  • 2 19 ounce cans black beans, rinsed and drained
  • 2 cups beef or veggie broth
  • 1 chipotle pepper, chopped (use 2 if you like it extra spicy!)
  • 1 14 ounce can chopped tomatoes
  • 1/2 lime
  • 1/4 cup red wine
  • 1/4 cup fresh chopped cilantro

Instructions:
  1. Heat the olive oil over medium high heat in a saucepan.
  2. Add the onion and sweet pepper and saute until softened
  3. Add the garlic and saute for 30 seconds
  4. Add the beans, broth, chipotle pepper and tomatoes
  5. Simmer 10 minutes
  6. Squeeze the juice from the lime and add to the soup.
  7. Add the wine and stir well
  8. Stir in the cilantro and serve

Enjoy!

Saturday, June 26, 2010

Sole Meuniere

Here is another recipe from the 2010 FIFA World Cup Menu - Week 3. What a simple and tasty way to show off the wonderful taste of a lovely piece of fish! This recipe can be made with any white fish. I've done it with a nice piece of cod before and it was lovely. Also, you can leave off the dredging of flour. Some days I just can't be bothered. Yes, anything in butter is good....

Sole Meuniere
Serves 4

Ingredients:
  • 4 4 - 5 ounce sole or white fish fillets
  • 1 cup flour
  • 4 tbsp butter
  • salt and pepper
  • 2 tbsp chopped fresh parsley
  • 2 tbsp fresh lemon juice
  • 4 lemon wedges

Instructions:
  1. Heat 3 tbsp of the butter in a saucepan over medium high heat.
  2. Add the parsley and let the butter turn golden brown
  3. Reduce the heat to medium and add the fish fillets
  4. Cook until the fillets are golden on both sides
  5. Season with salt and pepper as you like
  6. Remove the fish from the pan.
  7. Add the remaining tbsp of butter and the lemon juice.
  8. Heat until the butter stops foaming
  9. Place the fish fillets on their plates and pour the sauce evenly over each fillet
  10. Serve with a lemon wedge.

Enjoy!

Wednesday, June 23, 2010

FIFA World Cup Menu - Week 3

Thus far it's been an interesting World Cup. I've been disappointed and shocked, often at the same time... Actually, that's pretty normal for the World Cup. That's why it's so much fun. It never goes exactly as you expect!

Here's week 3's menu.

2010 FIFA World Cup Menu - Week 3

1. South Africa - Bobotie (Beef Pie)
2. France - Sole Meuniere (without the same type of controversy the team has generated this year!)
3. England - Fish and Chips (We're cheating and buy this from take out. A new place opened up near me and it's causing a buzz so I must try it!)
4. Greece - Chicken Souvlaki
5. Honduras - Black Bean Soup

The official recipe for South Africa is the Bobotie. I wasn't keen on making a beef pie to bake in the oven this time of year but it is winter there... So I'll bite the bullet and be authentic.

I'll add the links to the recipes as I add them during the week. Enjoy!

Here are the other weeks in the 2010 FIFA World Cup Menu
Week 1
Week 2
Week 4
Final Game Menu

Tuesday, June 22, 2010

Algeria - North Africa Burgers

The final recipe from the 2010 FIFA World Cup Menu - Week 2. Deadly easy and even better tasting! These will become part of my regular summertime repertoire.


Algeria - North Africa Burgers
Serves 4

Ingredients:
  • 1 lb ground beef

  • 2 tsp ground cumin

  • 2 tsp paprika, hot if you have a choice of which type

  • 2 tsp garlic powder

  • 1 tsp ground coriander

  • 1 tsp curry powder

  • 1/2 a large red onion, sliced

  • 4 pitas

  • lettuce, tomato, cucumber

  • yogurt dressing or tzatziki sauce

Instructions:


  1. Mix the beef with the cumin, paprika, garlic, coriander and curry.

  2. Form into patties, I made mine more oblong to fit in the pita

  3. Heat a pan or grill to high

  4. Sear the burgers and red onion on the grill, turn and cook until cooked to your liking.

  5. Remove the burgers from the grill or pan, turn off the heat

  6. Place the pitas on the grill or pan and warm on each side

  7. Assemble the burgers on each pita with lettuce, tomato, cucumber and yogurt sauce.

Enjoy!

Argentina - Empanadas

Here is yet another recipe from the 2010 FIFA World Cup Menu - Week 2. You can use chicken or pork. I used pork but afterwards realized chicken would have been a good idea. I also used refrigerated crescent rolls for most of the empanadas but had leftover filling so I had those on a pita for lunch. Frozen puffed pastry would also work perfectly here. So it's up to you!

Argentina- Empanadas
Serves 4 - 6

Ingredients:
  1. 3/4 - 1 lb lean pork loin
  2. 1 tsp dried thyme
  3. 1 tsp dried oregano
  4. 1 tbsp sweet and/ or hot paprika (I used a bit of both)
  5. 1 tsp garlic powder
  6. 1/4 cup olive oil
  7. 2 medium onions, cut in strips
  8. 2 medium peppers, green, red, yellow or orange (I used a bit of green and yellow)
  9. 2 tbsp white wine or chicken broth
  10. salt and pepper to taste
  11. pitas, refrigerated crescent roll dough or frozen puffed pastry

Instructions:
  • Slice the pork into 1/4 inch strips
  • Mix thyme, oregano, paprika, garlic powder and olive oil in a dish large enough to hold the pork
  • Add the pork and let marinate at least 4 hours or overnight
  • Heat a large skillet over medium high heat.
  • Add the pork to the pan and cook until the meat is brown on all sides
  • Meanwhile add the peppers and onions to the marinate and toss
  • Remove the pork from the pan and set aside, keep warm
  • Add the peppers, onion and marinate to the pan.
  • Add the white wine or broth.
  • Simmer until the peppers and onions are soft
  • Return pork to the pan and toss
  • If using the pitas, put some of the meat mix in each pita and serve.
  • If using dough preheat the oven to 350 degrees.
  • Roll out to make rectangles. The refrigerated crescent roll dough will give you 4 empanadas. The puffed pastry will have to be cut. Roll it to about 1/4 inch thick and cut into rectangles.
  • Put a bit of filling in each rectangle, being careful not to overfill
  • Fold over one side to make a triangle.
  • Cook in a 350 oven for 12 - 20 minutes until the dough is golden.

Enjoy!

Saturday, June 19, 2010

Denmark - Toast Skagen

Here's another recipe from the 2010 FIFA World Cup Menu - Week 2. This is one of my very favorites. I used to spend a lot of time in Sweden and I fell in love with the country. This is a common appetizer.  Midsommer is one of my favorite holidays anywhere, anytime! The Danish call it Sankthansaften. The Scandinavian countries are quite similar although I know for a fact that none of them would agree to that!

I love Toast Skagen and it really is a perfect summer dish. Yes it's more of an appetizer than a meal but I could not resist including it in this menu. The name comes from the northern tip of Denmark, Skagen which is a popular fishing port. So even though it is really Swedish I had to include it. Really - it screams summer!

I was also torn because even thought the Swedish national team didn't make the world cup, they are celebrating a royal wedding today! Crown Princess Victoria is getting married (or is by the time this is posted)! So perhaps my little cheat here will be forgiven. Don't forget, Midsummer is celebrated in Denmark on the evening of June 23rd. The actual summer solstice is June 21st. I may have a shot of Aquavit on both days! Celebrate the longest day of the year! Skaal! (Proncounced Skoal!)

Toast Skagen
Serves 4

Ingredients:
  • 1lb small peeled cooked shrimp
  • 4 tbsp mayonnaise
  • 4 tbsp creme fraiche or sour cream
  • 3 tbsp chopped fresh dill
  • 1/2 tbsp fresh lemon juice
  • salt and pepper
  • 4 slices white bread, buttered
  • 3 oz white fish caviar (I've used the sushi red fish eggs because that's what I could get locally and they worked perfect)
  • diced red onion for garnish
  • lemon wedges for garnish
Instructions:
  1. Dice up the shrimp
  2. Mix the mayo, creme fraiche, dill and lemon juice. Salt and pepper to taste
  3. Add in the shrimp
  4. Saute the bread until golden, cut into triangles
  5. Spoon the mixture on each triangle of bread
  6. Top with caviar, red onion and a sprig of dill
  7. Serve with a wedge of lemon on the side.
Enjoy with a shot of aquivat. Skaal!!

Korea - Kalbigui

Here's another recipe from the 2010 FIFA World Cup Menu - Week 2. Time for some ribs! Nothing screams summer more than ribs on the barbie. Today they're going to take a Korean twist. I've often seen this recipe done with beef short ribs but I have also seen it done with pork ribs. Use whatever you like. Life's easy.

Korea Kalbigui
Serves 4

Ingredients:
  • 1 tbsp sesame oil
  • 4 tbsp soy sauce
  • 4 cloves garlic, minced
  • 2 tsp ginger, minced
  • 1 tsp chili powder
  • 2 tsp sugar
  • 2 lbs ribs
  • 2 tbsp sesame seeds

Instructions:
  1. Mix the first 6 ingredients together in a pan big enough to hold all the ribs
  2. Add the ribs, turn to coat thoroughly and marinated for at least 4 hours
  3. Heat the barbecue on high.
  4. Barbecue the ribs for 10 minutes on each side or so until cooked through. Baste with remaining ribs sauce with each turn.
  5. Sprinkle on the sesame seeds and let them brown a bit on the ribs.
  6. Serve with kimchi, a green salad with sesame dressing or an asian slaw made with shredded cabbage and carrots tossed with a little mayo, soy sauce, lime juice and cilantro.

I'm really enjoying incorporating asian flavours into the barbecue these days! Yum!

Thursday, June 17, 2010

FIFA World Cup Menu - Week 2

Here it is! Week 2. 3 games a day, I'm in total overload. And I've discovered I'm seriously going for Spain. I was quite disappointed when they lost their first game. For the whole day... The emotions one goes through for their favorite teams - sigh - I'll never make it to the end!

2010 FIFA World Cup Menu - Week 2

1. Argentina - Pork Empanadas
2. Denmark - Toast Skagan (June 23rd is Sankthansaften or Midsummer in Denmark. Time to celebrate!)
3. Korea - Kalbigui (Grilled Ribs)
4. Italy - Pea Risotto
5. Algeria - North Africa Burgers

This week is going to be fun. I have fresh peas, first batch from the Annapolis Valley, Nova Scotia! They'll make a great risotto. The link here is for my general risotto recipe. I've blogged about it a couple of times, type risotto in the search box on this page in the upper left corner and you'll get lots of tips and tricks. I just used shallots, garlic, and peas in this one. It was awesome.

Toast Skagan is a lovely summer treat and one of my favs. The Korean Ribs will be lovely on a hot day.

I'm looking forward to making empanadas but instead of making the dough (if you have a Mexican, South American or African food market handy you could pick up the empanada bread there, I don't have such a place around here) I'm going to just use pita bread or refridgerated cresent roll dough. Life doesn't have to be complicated to experience the great flavours of the world!

Check back as I'll add links to the recipes above as I add them to the blog, just like last week.

Here are the links to the other weeks in the 2010 FIFA World Cup Menu
Week 1
Week 3
Week 4
Final Game Menu

Tuesday, June 15, 2010

Portugal - Pasta with Mussels and Chorizo

Here is the last recipe for the 2010 World Cup Menu - Week 1. Week 2 will be up soon!

This is one of those recipes where freezing leftover pasta pays off. You can skip a time consuming step for this recipe if you already have pasts cooked and ready to go!

If you have a choice of chorizo, obviously get the portugese chorizo if you can but if you only have a choice between spanish and mexican, get the spanish.

Portugal - Pasta with Mussels and Chorizo
Serves 4 - 6

Ingredients:

  • 1 lb pasta, penne, or small spirals
  • 1 tbsp olive oil
  • 2 chorizo sausage links, chopped
  • 2 shallots, finely chopped
  • 2 cloves garlice, minced
  • 1/2 cup white wine
  • 4 lbs mussles, washed and debearded
  • 1/2 cup chopped fresh cilantro
  • 1/4 cup chopped fresh flat leaf parsley
  • 1/2 cup fresh lemon juice
  • Salt and Pepper to taste

Instructions:

  1. Cook the pasta according to the package instructions, reserve 1 cup of the cooking liquid before draining. Set aside
  2. In the same pot you cooked the pasta in, heat the oil over medium high and saute the chorizo and shallots until golden
  3. Add in the garlic and cook for 30 seconds
  4. Add in the wine and simmer about 5 minutes until reduced by half
  5. Pour the sausage mixture into a bowl and keep warm.
  6. Add an inch of water to the bottom of the same pot and add the mussels.
  7. Bring to a boil and cook until the mussels are open, about 4 minutes
  8. Drain the mussels, add in the pasta, sausage mixture and mussels all to the pot.
  9. Add the leftover pasta water as necessary to get a nice moist pasta
  10. Sprinkle with cilantro, parsley and lemon juice
  11. Salt and Pepper as necessary

Enjoy!!

ps. I threw in some chopped up beet greens with the sausage and shallots. It was a great way to up the veggie content and a great way to use up some 'in season' beet greens. They tasted perfect!

Monday, June 14, 2010

Japan - Chicken Yakitori

Yet another recipe from the 2010 FIFA World Cup Menu - Week 1. This is beyond simple, perfect for the barbecue and super healthy. You can serve these tasty skewers with brown rice, whole wheat spaghetti or soba noodles. Or for a super light meal, serve them a bed of lettuce leaves.

This recipe calls for mirin which can be hard to find. Mirin is a sweet rice wine. If you can't find it use a mixture of 2/3 rice vinegar, 1/3 water and a bit of sugar. You are looking for a sweet tangy taste.

Chicken Yakitori
Serves 4

Ingredients:
  • 2/3 cup soy sauce
  • 1/4 cup mirin
  • 1 tbsp sugar (even if you use the mirin substitute listed above, add this amount in addition to what you put in the vinegar mix)
  • 8 boneless skinless chicken thighs
  • 8 shitake mushrooms
  • 8 green onions, cut into 1 inch lengths
  • 1 each, red and green pepper cut into 1 inch chunks

Instructions:
  1. If using bamboo skewers, soak in water for 30 minutes
  2. In a saucepan, mix soy, mirin and sugar.
  3. Heat until the sugar is dissolved and let cool
  4. Heat the barbecue or broiler to high
  5. Thread the chicken, mushrooms, green onions and peppers onto the shewers
  6. Brush the skewers with the sauce and barbecue or broil, turning until cooked through.
  7. Baste with the sauce as you turn the skewers
  8. Serve over rice or noodles with the leftover sauce.

Enjoy! So far the Japanese have won their first game on foreign soil in the World Cup!

Friday, June 11, 2010

Australia - Shrimp on the Barbie

Here's another recipe for the 2010 FIFA World Cup Menu - Week 1. This recipe is ridiculously simple and perfect for the summer barbecue. I'm not sure how really authentically Australian it is but to those of us here in North America it's what we think of first when someone says "Australia!". Well that and Foster's beer. If you really feel the need to be authentic, have a Foster's with your meal (save the can for beer can barbecuing a turkey later)!

This recipe calls for leaving the shells on so they don't dry out and overcook on the bbq. If you want to remove the shells for easy eating, only marinate for 10 minutes max otherwise the lemon juice will cook the shrimp!

Australia - Shrimp on the Barbie
Serves 4

Ingredients:

  • Wooden skewers
  • 1/2 cup fresh lemon juice
  • 3 cloves garlic, minced
  • 1 shallot, finely diced
  • 1 lb large shrimp in the shell
  • Salt and pepper
  • 4 cups of spinach leaves
Instructions:

  1. Place wooden skewers in the water to soak
  2. Mix lemon juice, garlic and shallots together
  3. Toss in shrimp and let marinate for one hour
  4. Heat the BBQ on high.
  5. Thread the shrimp on the skewers and sprinkle with salt and pepper
  6. Cook the shrimp on the BBQ until cooked through
  7. Serve on a bed of spinach.
Yup, that's it. Enjoy!

Mexico - Fish Tacos

Here is the first recipe for the 2010 FIFA World Cup Menu - Week 1. I'm watching South Africa and Mexico play right now! I may be a little too excited for this World Cup... (OMG, South Africa just scored the first goal of this World Cup!!! WAAAHOOOO!)

Mexican Fish Tacos
Serves 4

Ingredients:
  • 8 Small soft tortillas
  • 2 tsp vegetable oil
  • 1 large yellow onion, chopped
  • 2 cloves garlic, minced
  • 2 large tomatoes, chopped
  • 2 tsp cumin
  • 2 tsp dried chipotle chili powder or 1 whole canned chili, diced
  • 2 tsp dried ancho chili powder
  • 5 - 10 dashes of Tabasco, depending on how spicy you want it!
  • 1 lb cod or a firm white fish, cut into 1 inch cubes
  • 2 cups shredded lettuce
  • 1 avocado, diced
  • 4 green onions, sliced

Instructions:
  1. Heat oil in a pan over medium high heat
  2. Add onions and saute until soft
  3. Add garlic, tomatoes, cumin, chipotle, ancho chili powder and Tabasco to pan
  4. Simmer 5 minutes
  5. Remove mixture from pan
  6. Add more oil if necessary and add cod to pan
  7. Sear cod on both sides until cooked through and then add tomato mixture back to the pan, toss
  8. Warm tortillas if desired
  9. Assemble tacos by dividing the cod and tomato mixture between the 8 tortillas
  10. Top with lettuce, avocado and green onions.
Enjoy the game!

Thursday, June 10, 2010

FIFA World Cup Menu - Week 1

Are you ready for some football?!?!?! Okay, not that kind of football just yet! How about some world football, that thing we call soccer here in North America? Tomorrow the 2010 FIFA World Cup kicks off and as promised, I'll be cooking meals from some of the participating countries. I'm going to do 4, 5 day week menus featuring something from each continent each week (or mostly like that). Since it is summer in these parts I'm aiming for warm weather, mostly bbq type dishes. Keep in mind that I don't have access to all sorts of authentic ingredients for all the various world cuisines so I'll be doing my best with local goodies.

I was going to have the dishes to match who was playing each day but after the group stage that could get tricky... and I don't want to jinx anyone by assuming they either will or won't make it past the group stage!

So here we go! Ole, ole, ole, ole! Guaranteed to be fun month!

2010 FIFA WORLD CUP MENU - Week 1
  1. Mexico - Fish Tacos
  2. USA - Hot dogs and Fries or Sweet Potato Fries (there is no recipe for hot dogs, buy them at the grocery store - enjoy)
  3. Australia - Shrimp on the Barbie
  4. Japan - Chicken Yakatori
  5. Portugal - Pasta with Mussels and Chorizo
I'll add recipes as the week goes on so check back for the links. I'll add Week 2 next Thursday.

Here are the links for the other weeks in the 2010 FIFA World Cup Menu
Week 2
Week 3
Week 4
Final Game Menu

Wednesday, June 09, 2010

Beer, Bacon and Onion Soup

This is an interesting and simple variation on French onion soup.
Beer, Bacon and Onion Soup
Serves 4

Ingredients:
  • 4 slices bacon, cubed
  • 2 -3 cups sliced red, white, yellow onions, shallots
  • 1 cloves garlic, minced
  • 2 bottles beer
  • 2 bottles water
  • 1 tbsp Club House Le Grille steak spice or steak spice of your choice
  • 3 tbsp fresh or 1 tsp dried thyme
  • Salt and pepper to taste
  • Shredded cheese of your choice to top bowls (I used mozza and parmesan)
  • Sliced bread to top bowls.

Instructions:
  1. Heat bacon over medium heat until cooked.
  2. Add onions and saute until brown
  3. Add garlic and saute for 30 seconds
  4. Add beer, water, steak spice (and dried thyme if using)
  5. Simmer 15 - 20 minutes
  6. Salt and Pepper to taste
  7. Toss in fresh thyme
  8. Spoon in oven safe bowls and top with bread and cheese.
  9. Heat under the broiler until the cheese is bubbly
  10. (If you don't have oven safe bowls, toast the bread with the cheese on it until browned and place on top of soup in bowls)

Simple! Enjoy!

Thursday, June 03, 2010

Best Baked Fries and a Kicked Up Dip

Last night I had a portie burger and fries. I did the fries a little differently and they turned out so good I had to share. The burger was pretty basic, grilled portabello mushroom with cheddar, onions, bacon, tomato and lettuce with a little mayo on one side and a little of our kicked up dip on the other. I'll get to that in a minute. First the fries!

Most people have cut some fresh potatoes into fries, tossed them in olive oil and seasoning and baked them. Typically we put them on a baking sheet, sometimes with aluminum foil or parchment paper. Last night I threw them right on the oven rack. ***Put a tray underneath, on the lower rack or you'll get drippings on the bottom of your oven!*** This allowed the heat to get at them from all sides. Just that little difference in the cooking method made a huge difference in the end result. They were super crispy. I tossed on some spicy mesquite seasoning. They were perfect!

Now on to the Kicked Up Dip! Super simple. I often mix ketchup and mayo for a nice tangy dip or spread but this time I added Garlic Chili Pepper sauce to the mix. YUM!!

That's it. What a great pub style meal that was really healthy!

Wednesday, June 02, 2010

Gardening Update - We're almost all planted!

Okay, I'm getting there. For those of you saying "you haven't got everything in yet?!", tomorrow the high is suppose to be 11 Celsius (54 F) and the plants/seedlings are sitting outside. We're not exactly missing the great weather but the plants are still growing in their peat pots.

Today I got in the blueberry bushes. The first bush I bought is really just a twig. We'll see if it takes. Worse case I'll have to buy a new one for next year. The other bush is really nice and should do okay. I also put in some lavender and rosemary back in that corner but I'll probably move the rosemary next spring when I clear out behind my shed for a herb garden.

I also put in the final rows of beets and onions. That space if finally full. I have some beets and onions spouting out of the first 2 plantings. My garlic is doing awesome. It loves the chilly weather so it's been perfect lately. I also have 7 potato plants with leaves up through the soil. I've been mounding the soil around the leaves and only had to re-bury 3 potatoes. The space is on a bit of a slope so I've had some erosion but hopefully as the leaves come in that will stop. I'm keeping an close eye to ensure we have no potatoes enjoying the sunshine (and getting toxic green bits)

I have a couple more flower pots to do, just small ones with some leftover annuals I picked up to do the railing containers. I'm also going to do 2 pots of tomatoes since I have so many healthy seedlings. Then that will be it until later in the summer when I'll plant some spinach. The weeds are trying to beat me down but I won't let them! On a side note, I dug up the bottom of a fence post today while clearing out the space for the tomatoes. I didn't even know it was there!! There was no decay or breakdown of the wood... makes me wonder how much chemicals were in the wood to prevent it from decaying while sitting it wet mud... And that's where I'm putting tomatoes to eat. Well that's going to bother me for a bit.

I have a pair of knee pads that you velcro on to your legs. I've always hated them because the velcro in the back digs in when I bend. While drying off after my shower it dawned me that I could just turn around the velcro, have it in the front of the knee so it won't dig in also it will be on the outside of the pad and won't be anywhere near my skin. Brilliant. I've had those pads for years and am just now realizing this. Good gravy I'm quick!

Sunday, May 30, 2010

World Cup Countdown

11 days to the opening ceremonies of FIFA World Cup 2010! I'm starting to research the menu now. Needless to say the first meal will be from South Africa since they are the host nation. It's an eclectic cuisine so selecting a dish to represent the country is a challenge. I know one thing for sure, I'll be enjoying a bottle of their fine wine with my meal. My fav is the Two Oceans Sauvignon Blanc, perfect for a summer evening!

I'm doing this research as I listen to thunder and enjoy a bowl of beer, bacon and onion soup. I'll post the recipe soon. Hot soup today? Welcome to the Maritimes. I believe we have seen all 4 seasons today. Mom even had hail out at her place. I placed the tomato plants under cover just to be safe!

Stay tuned, menu to follow. I'm trying to keep it summer friendly, lots of bbq and warm weather meals!

Friday, May 21, 2010

Gardening Update and a Perfect Summer Salad

I have started to harden off the tomato and pepper plants. The weather has finally taken a turn for the warmer and I think it might be here to stay. Time to get the plants acclimatized to the great outdoors before they move to their new home out in the yard. (which I haven't cleared yet but I have 5-7 days to do that...)


My Sparta F1 Tomatoes have developed a slight case of blight. That's the yellowing on the leaves from over watering.
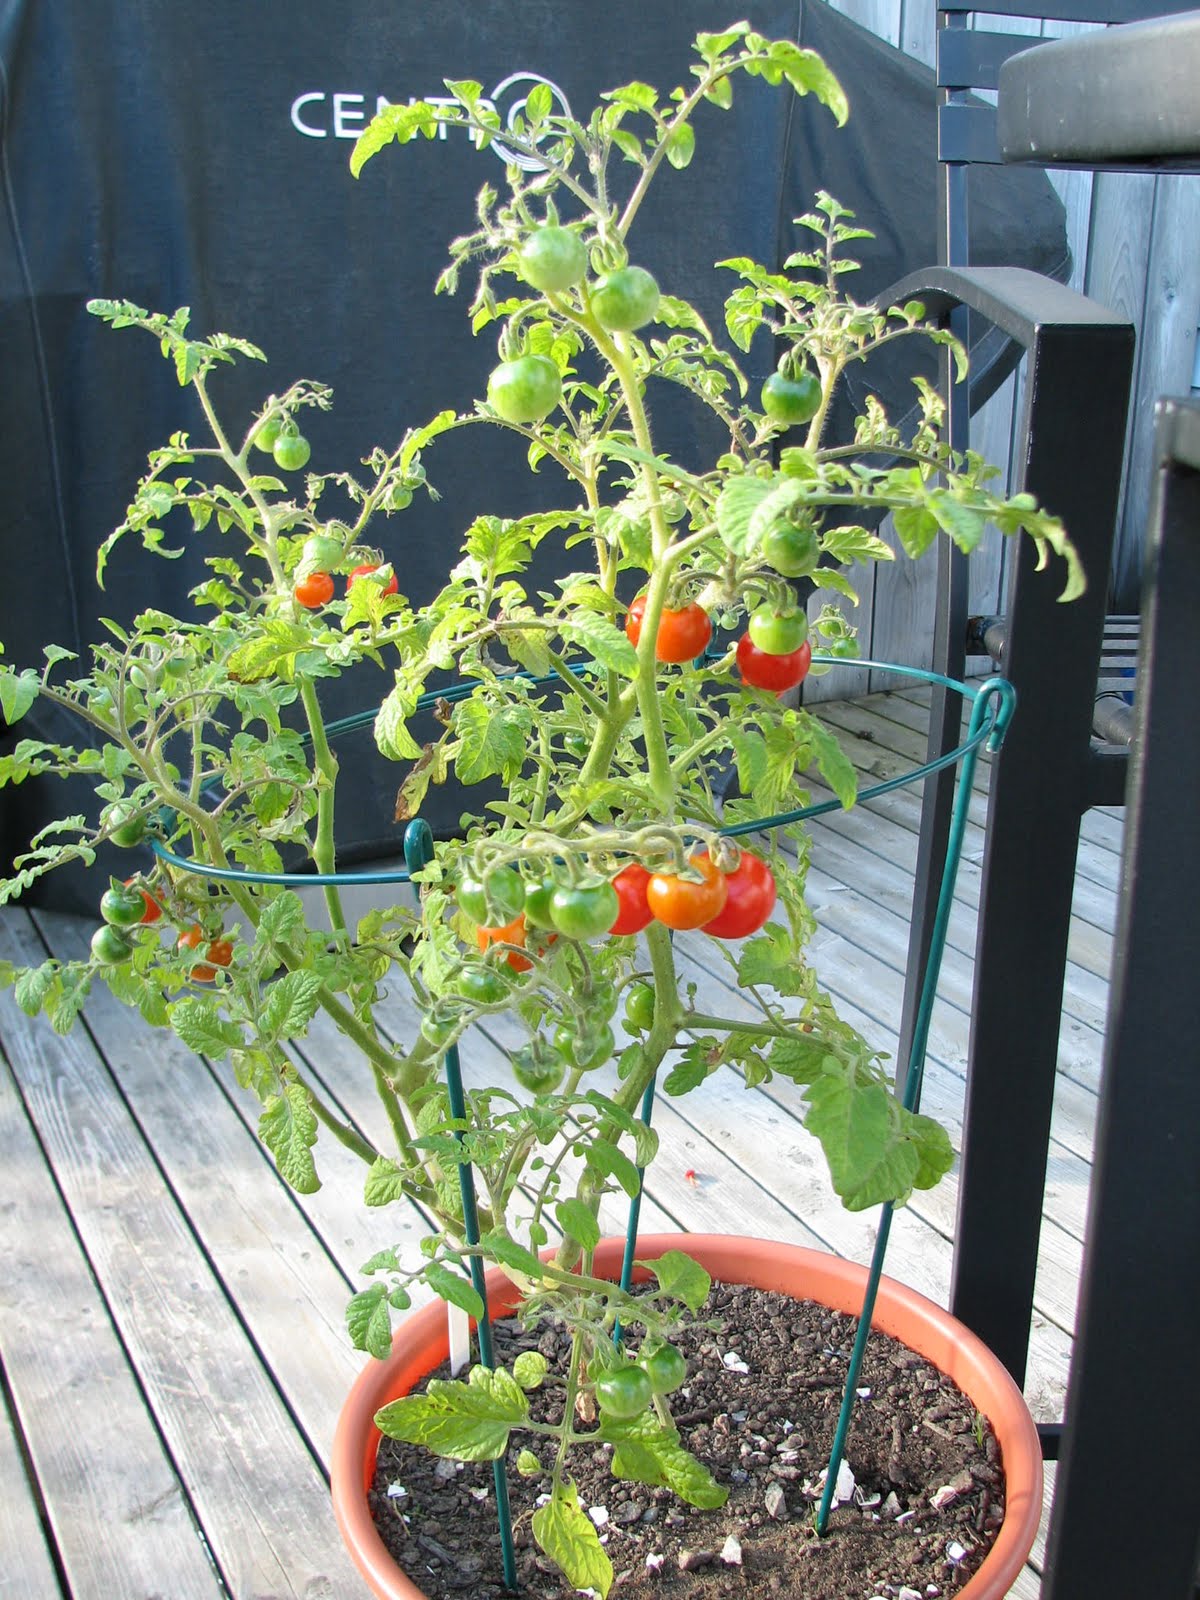
It's imperative that you water your seedlings from the bottom by sitting the peat pots in water. This encourages the roots to dig down and not sit at the surface. That being said, I've been worried that the plants weren't getting enough water from the bottom so I've over watered them a bit by accident. I picked off some of the leaves and am letting the Sparta tomato plants get a little drier. Hopefully they'll be okay for planting but I'll have to decide which plants go in the ground when the time comes. I only had planned on planting 2 of the Sparta Plants and I have 5 so I should have 2 suitable ones. I also have 2 cherry variety tomatoes, Sub Arctic Plenty and Sweet Millions so I won't be at a loss for tomatoes no matter how the Spartas turn out.

Okay, on to food. I love having lunch ready to go in the summer time. Who wants to take a break from frolicking in the warm summer sun to make lunch?! This is one of my favorites. Serve it on lettuce.

White Bean and Tuna Salad
Serves 4 Ingredients:
  • 1 can of white kidney beans or cannellini beans
  • 1 can of your favorite tuna
  • 1 medium tomato, chopped
  • 2 - 3 tbsp Olive oil, basil or garlic flavored is nice
  • Fresh basil, italian seasoning or balsamic vinegar (use your favorite!)
  • salt and pepper to taste

Instructions:
  1. Drain and rinse both the beans and tuna
  2. Mix everything but the salt and pepper, taste and only add enough salt and pepper as needed.


Tuesday, May 11, 2010

Healthy Chive Creamy Sauce

It's that time of year. The chives are taking over that section of the garden where I let them run amok. I've shared my chive butter before and I've already but up a full pound of it so far this season. But here's another quick use for chives, Healthy Chive Creamy Sauce. This sauce is healthy because it doesn't use cream but instead uses yogurt and heart healthy good fat mayo. It tastes like it's quite naughty. Try some on fish, chicken, potatoes, veggies.... I even put it on a poached egg on ham in an english muffin. Tasty!


Healthy Chive Creamy Sauce
Serves 2 -4
Ingredients:
  • 1/2 cup low fat plain yogurt
  • 2 tbsp mayo
  • 2 tsp dijon mustard
  • 1/3 cup chopped chives
Instructions:
  1. Mix all the ingredients together
  2. Serve
Pretty easy, eh?! Enjoy!

Monday, May 10, 2010

Thai Coconut Tofu Soup

Here is a great recipe for that impending summer explosion of veggies! (and it's deadly quick too!!) You can stuff this soup with tons of spinach or broccoli and basil. Don't feel like waiting for the veggies to grow? Frozen Asian mix works great too. I used tofu but you can use chicken or shrimp. And you can spice it up with lots of garlic chili sauce, a splash or two of Tabasco or diced red chilies. I love a recipe that can go with my flow.

(once again a sideways shot, no idea why it does this but I am not spending hours trying to fix it. turn your head, it's easier)


Thai Coconut Tofu Soup

Serves 4 - 6


Ingredients:


  • 1 tbsp vegetable oil

  • 1 onion, diced

  • 2 tbsp red curry paste

  • 1 tbsp grated fresh ginger

  • 900 ml carton of chicken or veggie broth

  • 400 ml can of coconut milk

  • 1 tbsp sugar

  • 1/2 tsp garlic chili sauce, Tabasco or a chopped dried red chili (add more if you want it spicy) (leave out if you want a mild soup)

  • 3/4 lb or 350 g package of extra firm tofu, diced into 1/2 inch cubes

  • 3/4 lb or 350 g package of frozen Asian mixed veggies, chopped fresh broccoli or 4 cups fresh spinach

  • 1/4 cup chopped fresh basil or cilantro (opt)


Instructions:


  1. Heat the oil over medium heat in a soup pot

  2. Saute the onions until soft

  3. Toss in the red curry paste and ginger until fragrant, about 2 - 3 minutes

  4. Add in the broth, coconut milk, sugar and garlic chili paste(is using) and bring to a boil

  5. Add in the tofu and veggies.

  6. Heat until the veggies are cooked and tender

  7. Toss in the basil or cilantro and serve

YUM!

Tuesday, May 04, 2010

Cheap, Tasty Reds

Just found a great red wine worth sharing. Under $10! It is one of the nicest Shiraz I've had in a while!

From Australia, may I introduce "The Accomplice"

Go forth, buy, drink, enjoy (especially with bbq steak!!)

Friday, April 30, 2010

From Peat Pucks to Peat Pots

Friday was the big day! I transplanted the seedlings into pots. Good thing to, when I took off the plastic wrap (see last post) there were pucks that were completely dried out! I had 3 Tomato plants, Sub Artic Plenty, that were looking pretty wilted. I re-soaked the pucks before I planted them in the soil in the pots. I have more seedlings than I need so if some don't make it I'll still be fine.

Thin out the seedlings (leave just one plant in each puck) when the second set of leaves appears. See the tiny set of second leaves? Ready to thin!
Only some of the peppers had the second leaf sets when I thinned them today but the roots were sprouting out of the bottom of the puck so I should be okay. Really you want that second set of leaves to be fully developed before you transplant so again I may be a bit early on the peppers but I'm hoping they'll be okay. As you can see the second set of leaves on the tomatoes are fully developed and the roots were coming out the bottom of the peat pucks which means they were ready for transplanting.

I mixed crushed (more like chopped) eggshells, used coffee grinds, perilite, potting soil and some seed starter potting soil (at some point I realized I was not starting seeds so only a bit of this was used).

I should have soaked the peat pots first. I read that seedlings need water from below, not watering from above so that the roots reach down, good and deep. Remember I mentioned I re-soaked the peat pucks before they went into the pots. I watered the pots from the top thoroughly and then I've spritzed the pots a bit, we'll see how that works. The soil was good and loose so the watering should have soaked down deep. I plan to keep water in the trays I have the pots in so they well continue to absorb moisture up through themselves.
Now these lovely little green sprouts will sit in the sun for a couple more weeks to get good and strong. I'll stroll them out to the deck on really warm days and then harden them off a week before they go outside (keep them outside for longer and longer periods of time so they are used to the temps outside before they go in the ground).


I have extra pots to do some tomatoes on my deck. The extra pots are actually empty food grade plastic buckets from the bakery department at mom's local grocery store. They just toss the buckets in the recycling so if you ask they will gladly keep them for you as long as you pick them up asap.


Tuesday, April 27, 2010

7 Day Healthy, Quick Menu

I'm finally getting around to posting the healthy, quick menu I promised back during the Paralympics. Month and a half late.... Wow!

When I do a menu for the week I balance out protein and carb sources. I make sure to include a veggie meal or two which is not only healthy but cuts costs. Each meal is linked to the recipe already on the blog. Create your grocery list by checking out each recipe and writing down what you don't already have on hand. If you are really feeling frisky double each recipe for freezing or lunches. The only recipe that isn't freezer friendly is the Greek Fajitas (actually you can freeze the meat and grilled veggies) but those leftovers are perfect for lunch!

The 7 Day Healthy, Quick Menu

  1. Chicken Fajita Pasta
  2. Maritime Seafood Chowder
  3. Heuvos Rancheros
  4. Pasta al Forno
  5. Greek Fajitas
  6. Jambalaya
  7. Beef and Broccoli Lo Mein

This menu is heavy on the can tomatoes which are extremely good for you. Try to get the low sodium or no salt added variety. You can always add more salt but you can never take it away....

Add a side salad to get an extra veggie serving into your meals or add more veggies in the meal itself. And don't be afraid of frozen veggies, especially in the off seasons!

Feel free to email me any questions!

Sunday, April 18, 2010

Gardening - Getting Started

Last year I put in a veggie garden along the side of my house. It was not a success story but I never give up so I'm back at it this year, determined to be successful! My yard is not big and the space is shared with 2 very large hairy dogs so space for gardening is seriously limited. However, like most foodies, I like to know where my food is coming from so the idea of growing my own is very appealing and worth the effort of finding spots around my yard to do so. I've been guilty of a basic gardening mistake - I start my garden way too late and the veggies don't have time to fully grow before the harvest season. This year I was determined to be different. I've plotted and I've planned.... And am having a hard time resisting the temptation to commit the other common basic gardening mistake - planting too early!


So after consulting books, the net, friends and family and the farmers' almanac I have determined that I'm late getting my beets, onion and garlic in and late starting my pepper seeds. However, I am on time starting my tomato seeds and planting potatoes. My garden has 2 criteria. One it must be done on the cheap. I'm using some leftover garlic I bought from the store, you just separate the cloves and plant them pointed end up, the potatoes will be grown from some leftover from a bag of potatoes bought for cooking. The beets and onion are from seed, as are the tomatoes and peppers. It is cheaper to start from seed and I already had the peat disks and a bunch of peat pots to put the disks in as they grow. You need about 6 - 8 weeks when you start seed inside. The beets and onion seeds will go directly in the ground. The peppers and tomatoes are started below.


This is my version of a humidity tray. I've always ended up killing the seedlings in a humidity tray so I wasn't keen on attempting seedlings with one this time and I didn't have one on hand anyway. Seedlings do need a good humid environment. It's amazing what you can do with a large pot tray and some plastic wrap! I think what I did wrong in the past was putting the tray directly in the sun. Apparently they should only be in a bright space but not in direct sunlight! As you can see, they are growing quite nicely.


I also suffer from another basic gardening mistake. I hate to thin out perfectly good seedlings. It goes against my fugal, efficient side to waste 2 out of every 3 seedlings! However it must be done. I went to do it today for my tomatoes (you can see the disks with little or no seedlings are the peppers, the other 15 disks are 3 types of tomatoes) and then read that it's too soon. I need to wait until the roots are penetrating the sides of the peat disks.


The second criteria for my garden is that I must be able to grow things here and there, where ever I can get some good sun and space that doesn't take away from the yard for the dogs to run and play and is safe from them. I have a strip along the side of the house that doesn't get full sun all day. It gets about 6 hours along the strip throughout the day so I'm going to put my root veggies there. Right along the back of my house there is full sun, it's protected a bit from the wind and the dogs are trained not to pee there That's where I'll put 2 - 3 tomato plants and 2 pepper plants. I have a lot of chives that grow there already. See my Chive Butter Pictorial for what to do with your abundance of chives.


I also have a blueberry bush! I may get a second. I only spent $7 on the bush. It's a 2 year old plant and I won't see any blueberries this year for sure. I have an area that had some fruit bushes but it's very overgrown and the bushes haven't done well since I bought the house because I didn't know what was what and just let the space grow. I'm going to clear it out and put the blueberry bush there. I'm just not sure what to do to keep the dogs out of that space. They've taken it over lately. I may have to fence it off a bit.


I will probably also put some of those tomato plants in some pots to keep on my deck with my herbs. I get great sun on my deck! The most important thing about growing anything in pots is to have pots that are big enough. You need really big pots to allow the roots lots of room. All of my herbs were very pot bound this spring and they were all doing so poorly. Also, anything done in pots needs a soil mix of about 1/2 potting soil and 1/2 some sort of moisture mix like perlite or vermiculite. Think less actual soil and more moisture retention. And remember to put some rocks or something in the bottom to allow proper drainage. A water logged plant won't grow any better than a dried out one will!


So why am I tell you all this? I'm going to take pics and keep you all posted as we go through the growing season. I'll share my successes, tips, failures, etc. And, of course, there will be recipes for the bounty... (here's hoping there is a bounty!)


Saturday, April 17, 2010

Tuna Pate

Since we are hot and heavy into shower season (the baby and bridal type, not the cleanliness type) I thought I'd share another great party dish. This pate always gets rave reviews no matter where I take it!

Tuna Pate

Ingredients:
  • 1 can tuna, drained
  • 8 oz/ 250ml cream cheese, softened
  • 1 pkg ranch salad dressing mix
  • 1 tbsp dried minced onion or 2 tsp onion powder
  • 1 tsp Worcestershire sauce
  • 1 1/2 tbsp lemon juice
  • 1 large garlic clove, minced
  • 1/4 tsp dry mustard
  • 1/4 c fresh parsley, finely diced or 1 tbsp dried parsley (optional)

Instructions:
  1. Mix everything together.
  2. Line a small bowl with plastic wrap, fill with pate, press down firmly and smooth top
  3. Chill for a couple of hours or overnight
  4. Plate by unmolding in the center and surround with crackers OR
  5. Shape pate into whatever you want, a rattle for a baby shower is nice! And chill.

Wheat Thins are the best cracker to go with this pate.
May your showers be short on games and big on wine....

Tuesday, April 13, 2010

Sausage Cheese Balls.... and list of excuses

Wow, has it been a while. I've been really busy getting ready for the gardening season and baby season. I've knit hats and booties for 3 different babies plus it's birthday month around here so that's more knitting. Whew! I still have a 7 day healthy menu to post. I'll get around to it....

But speaking of all things baby - I went to a baby shower this past weekend and I made a great party dish that is deadly simple. Sausage Cheese Balls are really easy and can be made ahead, even frozen before cooking. I like to make a batch at Christmas time. They are perfect for cocktails or tapas parties but also for having along with a brunch menu!

Sausage Cheese Balls - Makes 50 - 75 balls

Ingredients:
  • 3 Cups Bisquick
  • 1 lb sausage meat, flavour of your choice, casings removed and crumbled
  • 2 cups grated cheddar cheese
  • dash of Tabasco sauce

Instructions:
  1. Mix all ingredients in a large bowl.
  2. Shape into 1/2 inch balls
  3. Freeze until needed or
  4. Bake at 350 for 20 - 25 minutes until lightly browned

Enjoy!

Wednesday, March 24, 2010

Red Beans and Rice

I love this recipe. The beans and rice make a complete protein so it's an excellent meatless meal. It's also deadly cheap and super, super easy. Seriously, beyond simple. You can use brown rice if you like but it makes the fiber content really, really high (so drink lots and lots of water to avoid a backlog....) You can also spice it us as much as you like. Get out the Tabasco!


Red Beans and Rice
Serves 4 - 6

Ingredients:
  • Olive oil
  • 1 large onion, diced
  • 1 roasted red pepper, diced (or you can use a fresh one)
  • 2 cloves garlic, minced
  • 2 tsp dried oregano
  • 1 tbsp cajun seasoning
  • 19oz/540 ml can of red kidney beans, do not drain
  • 28 oz/796ml can of diced tomatoes, no salt added
  • 3/4 cup long grain rice
  • 1 1/2 cup water
  • 1 tbsp brown sugar
  • salt and pepper to taste
  • 1 cup shredded cheddar cheese


Instructions:

  1. Coat the bottom of a saucepan with oil and heat over medium
  2. Add the onions and peppers and cook until soft
  3. Add all the remaining ingredients, bring to a simmer, cover and cook until the rice is done. (the rice package should give you a pretty good idea of how long this will take)
  4. Serves sprinkled with cheese
Dang this is good!

Saturday, March 20, 2010

Indian BBQ - Acorn Squash Perfection

Okay, I know I never posted a Paralympics menu. Man have I been busy lately! And I haven't even touched the backyard yet. I'm hoping to clear out some old bushes and put in a blueberry bush, some tomatoes, maybe some peppers. On the side of the house, in space that we cleared last year, I am planning on planting some root veggies, potatoes, onions and maybe some garlic. But I digress.

Since I didn't get a menu up for the Paralympics, I thought I'd share what I did pull together as a "Healthy Menu" with links to all the recipes. I'll try to get that up in the next couple of days.

But to talk about the meal I had tonight... YUM. BBQ season is officially full on around here. I did a Tandoori Beer Can Chicken which is definitely going to be a summer mainstay! I also did 2 acorn squash. Super simple.

Acorn Squash Perfection:
Cut the squash in half and scoop out the seeds. Drizzle with honey, toss in some onion slices and sprinkle with curry powder. Roast while doing a chicken or roast on the bbq, about 350 F for an hour or so, until you can poke a fork into the flesh. Don't drain out the liquid that accumulates in the centre! Put it in a bowl and scoop out the flesh and add it. Add a little butter and mash. That's it. You'll be amazed.